
Alright audience, gather around.
Today’s episode: how to add sitemap in website — basically how I convince Google to stop wandering blindly and actually find my pages.
A sitemap is like the map I give Google so it doesn’t behave like that friend who always gets lost even with GPS.
So let me show how I upload sitemap.xml to website, how I register sitemap with search engines, and how I submit XML sitemap to Google like a proud parent showing off a kid’s report card.
Let’s start before my brain goes on a lunch break.
Deep Step-by-Step: How I Add a Sitemap to My Website
Step 1 — Generate the sitemap (automatic or manual)
- I decide how the sitemap will be made:
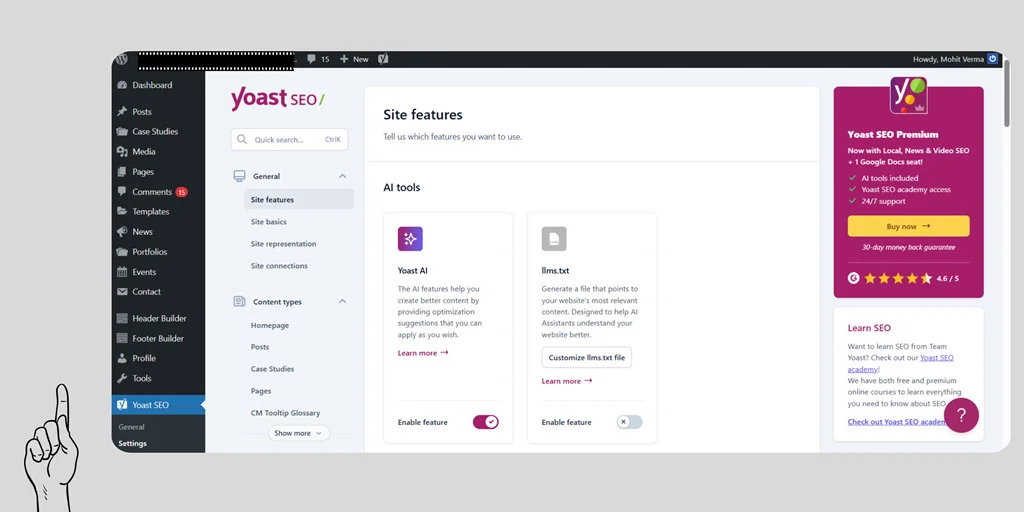
- If the website runs on WordPress (or another CMS), I install a sitemap plugin like Yoast or Rank Math.
— I open WordPress dashboard → Plugins → Add New → search “Yoast SEO” or “Rank Math” → Install → Activate.
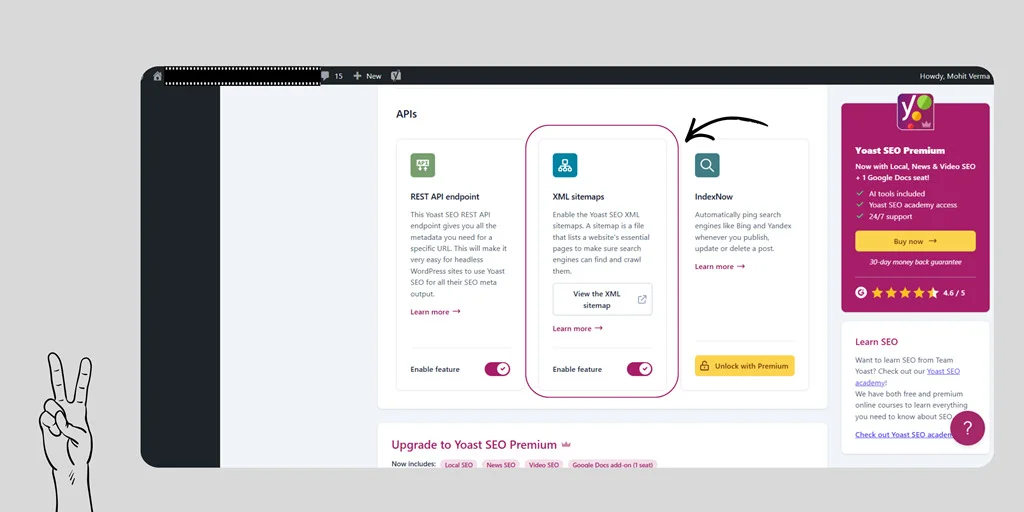
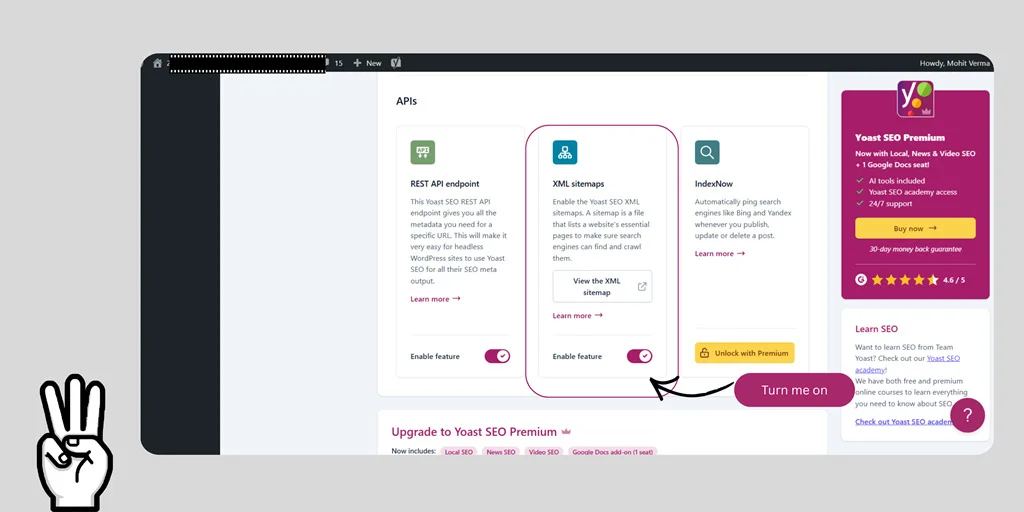
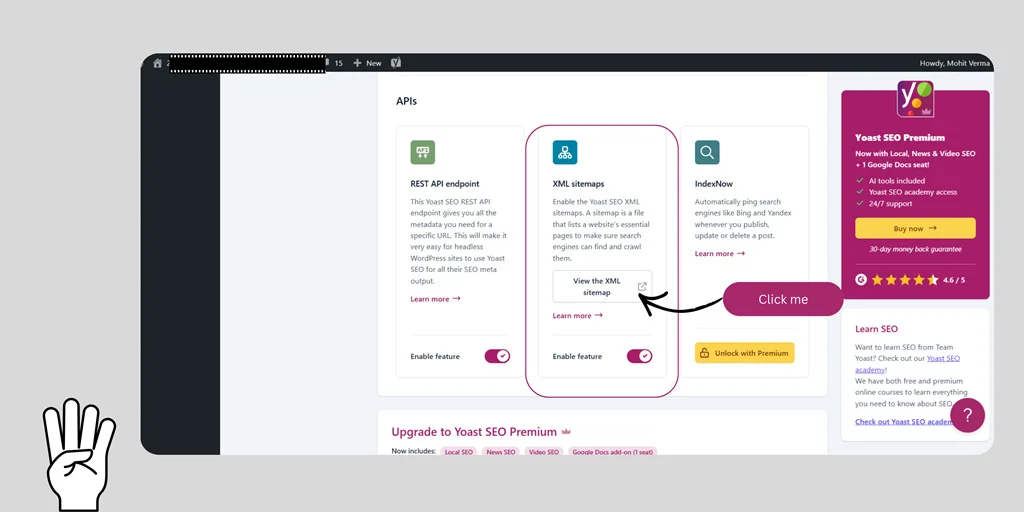
— Inside the plugin: I go to the plugin’s settings → look for XML Sitemaps or Sitemap section → enable it.
— The plugin shows a link like https://mywebsite.com/sitemap_index.xml. I copy that link.
This is how I generate and submit sitemap in WordPress (or other CMS) easily. - If the website is static (no CMS), I create a sitemap file manually or use an online sitemap generator:
— I type all page URLs in a simple XML format or use a generator that makes sitemap.xml for me.
— I download the sitemap.xml file to my computer.
- If the website runs on WordPress (or another CMS), I install a sitemap plugin like Yoast or Rank Math.
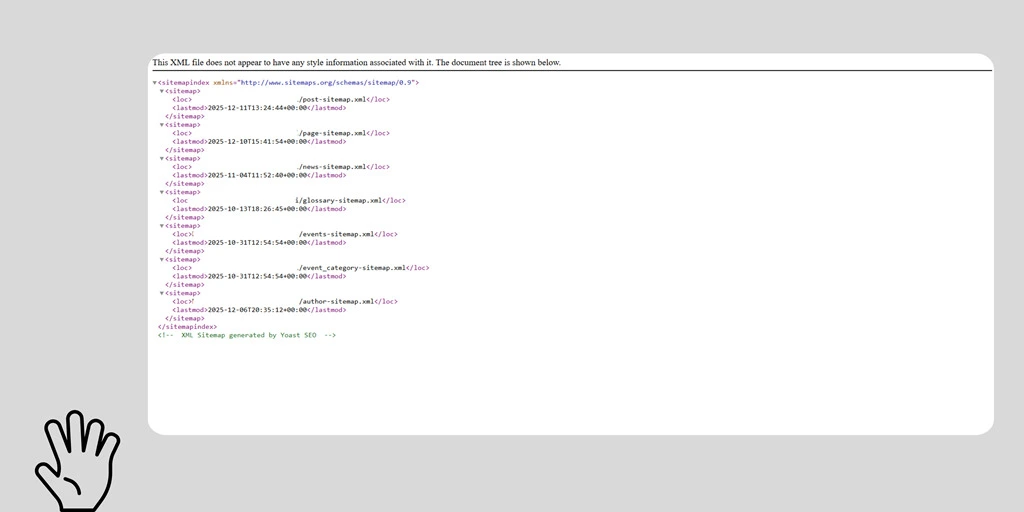
- I check the sitemap file by pasting the link or opening the XML file in a browser.
— If the file shows a list of links, the sitemap is valid. If it shows an error, fix the format (each URL needs
url><loc>https://example.com/page</loc></url>).
I have written a detailed blow on how to generate sitemap using yoast SEO plugin. You can go and check that out too.
Step 2 — Upload sitemap.xml to the website (if needed)

- If a plugin created the sitemap, skip upload — the plugin already places it on the site.
- If manual, I put the sitemap.xml file into the website root folder (this is the main folder visitors reach with https://mywebsite.com).
- Two easy ways to upload:
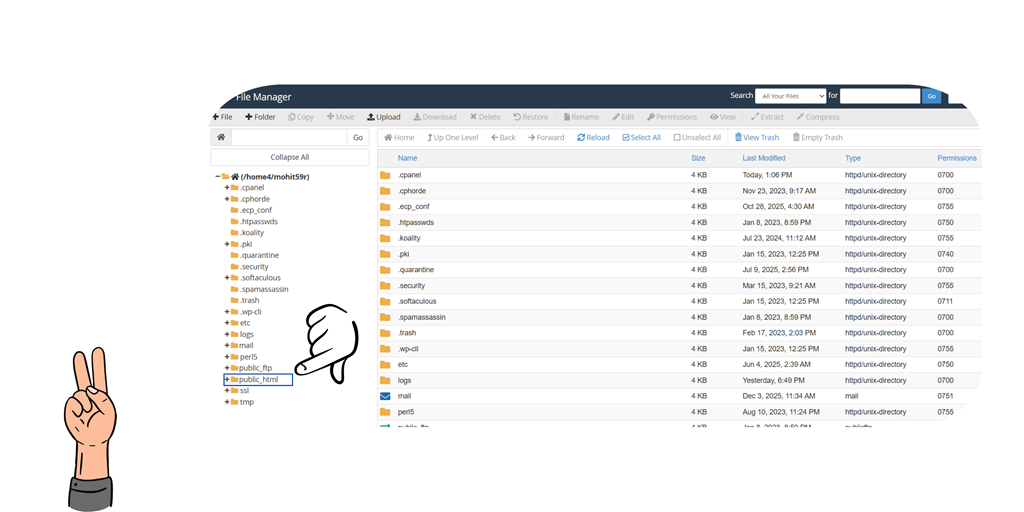
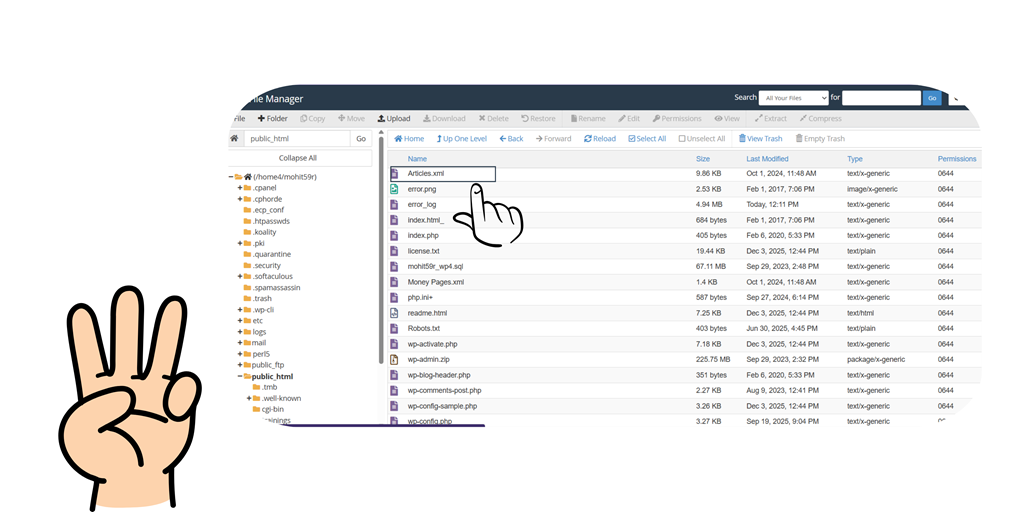
- Using cPanel / File Manager (common for many hosts):
— Log in to hosting control panel → File Manager → open public_html (or www) → click Upload → choose sitemap.xml → wait for upload → confirm at https://mywebsite.com/sitemap.xml. - Using FTP (File Transfer Protocol):
— Open an FTP client (like FileZilla) → connect with host, username, password (provided by host) → navigate to root folder → drag sitemap.xml into the folder → check https://mywebsite.com/sitemap.xml
- Using cPanel / File Manager (common for many hosts):
- This is how I upload sitemap.xml to website when not using a CMS plugin.
- Two easy ways to upload:
Step 3 — Register sitemap with search engines (tell them it exists)
- First, I make sure the website is verified in the search engine tools:
- For Google: Open Google Search Console → add property (site) → choose domain or URL-prefix → follow verification steps (HTML file, DNS record, or tag).
- For Bing: Open Bing Webmaster Tools → add site → verify similarly.
- After verification, I register the sitemap:
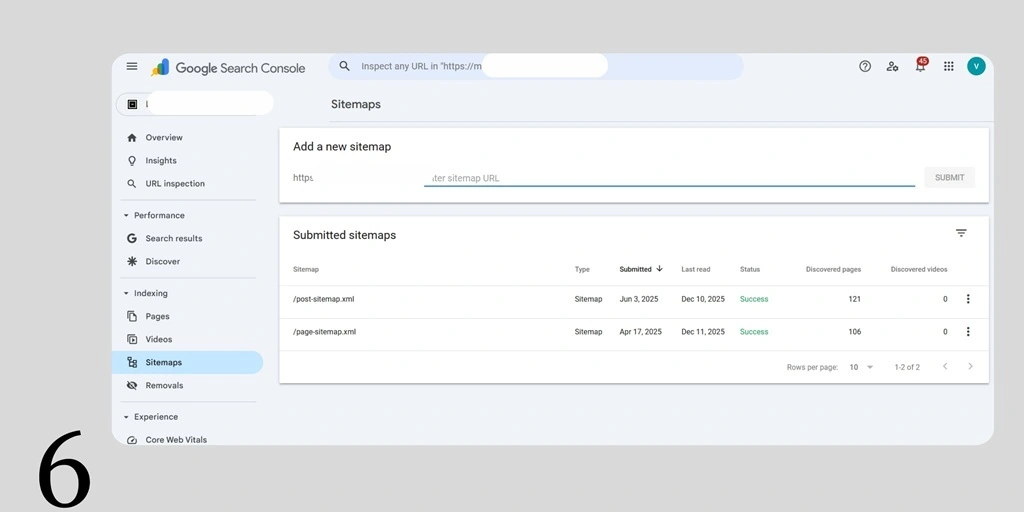
- In Google Search Console → select site → Sitemaps → paste sitemap_index.xml or sitemap.xml into the “Add a new sitemap” box → Click Submit.
- In Bing Webmaster Tools → Sitemaps → Submit sitemap URL.
This is how I register sitemap with search engines so search engines know the map exists.
Step 4 — Submit XML sitemap to Google (exact tiny clicks)
- I open Google Search Console.
- I pick the right property (the exact website).
- I click Sitemaps from the menu.
- In the box under “Add a new sitemap,” I paste sitemap_index.xml (or sitemap.xml).
- Click Submit.
- Wait for Google to say “Success” or show a status.
This exact flow is how I submit XML sitemap to Google so crawling can begin faster.
Step 5 — Configure sitemap for SEO (make sitemap helpful)
- I decide which pages belong in the sitemap:
- Include important pages: homepage, product pages, blog posts, category pages.
- Exclude pages like login pages, admin pages, or staging copies.
- I set priorities and last-modified dates (if possible):
- Plugins often manage <lastmod> automatically. That tells search engines when a page changed.
- I check robots.txt:
- I open https://mywebsite.com/robots.txt.
- If needed, I add the sitemap line at the bottom:
Sitemap: https://mywebsite.com/sitemap_index.xml - This helps bots find the sitemap faster.
- I confirm sitemap URLs use HTTPS (if the site uses HTTPS), and the domain is consistent (no mixing www and non-www).
All these small choices are how I configure sitemap for SEO so the sitemap really helps ranking and crawling.
Step 6 — Test and monitor (keep an eye like a guardian)
- After submission, I check Search Console for errors:
- Google shows number of submitted URLs and indexed URLs.
- If there are errors (404, blocked by robots, server error), I fix the problems and resubmit.
- I use the “Inspect URL” tool in Search Console for important pages to see if Google can fetch them.
- I wait a few days and re-check index status. I don’t panic — patience works.
- If sitemap changes a lot, I resubmit or ping search engines:
- Quick ping: open a browser and visit:
http://www.google.com/ping?sitemap=https://mywebsite.com/sitemap.xml - This politely notifies Google the sitemap changed.
- Quick ping: open a browser and visit:
I have designed one tool to extract the urls from any sitemap. You can go and check that out too.
Step 7 — Troubleshooting common problems (tiny fixes that save big headaches)
- Sitemap shows errors in Search Console → open error details → fix the listed URLs (404 = remove or redirect; blocked by robots = edit robots.txt).
- Sitemap not found → Check upload location or plugin settings → make sure sitemap is at root or plugin is enabled.
- Wrong URLs in sitemap → Regenerate sitemap or change site settings to correct domain (www vs non-www, http vs https).
- Large websites → Use sitemap index (Yoast or Rank Math creates sitemap_index.xml which links many smaller sitemaps). This prevents file-size limits.
Quick Checklist (I follow this every time)
Monitor errors in Search Console and fix them
Generate sitemap (plugin or generator) — Generate and submit sitemap in WordPress (or other CMS) if using CMS
- Open https://mywebsite.com/sitemap.xml to confirm it loads
- Upload sitemap.xml to root if manual — Upload sitemap.xml to website
- Verify site in Search Console / Bing → Register sitemap with search engines
- Paste sitemap URL in Search Console → Submit XML sitemap to Google
- Add Sitemap: https://mywebsite.com/sitemap_index.xml to robots.txt → Configure sitemap for SEO
FAQs
Is adding a sitemap necessary?
Yes, I add it because it helps Google find my pages faster.
A sitemap is like handing Google a clean menu instead of letting it search the kitchen.
Is sitemap submission a one-time thing?
Yes, I submit it once.
After that, Google automatically updates it when my site changes.
What if my sitemap doesn’t load?
I check file location and clear cache.
Sometimes the sitemap takes a small nap. Refreshing usually wakes it up.
Do small websites need a sitemap?
Yes, I add it anyway.
Even small shops use signboards. My website deserves one too.
Should I submit the sitemap to Bing too?
Yes, I submit it.
Bing may not be the most popular cousin, but still part of the family.
Final Thoughts
So audience, this is exactly how I add sitemap in website, how I upload sitemap.xml to website, how I register sitemap with search engines, and how I submit XML sitemap to Google without losing any hair.
The whole thing is easy, quick, and honestly… kind of fun once the panic goes away.
If Google had emotions, it would hug me for making its job easier.

